Purchase & Assembly
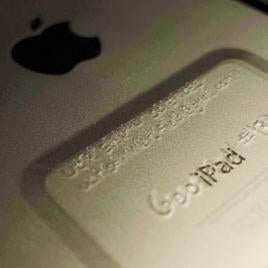
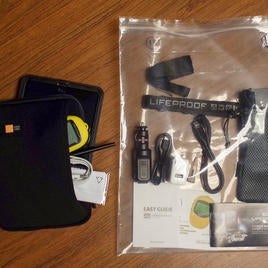
Should be straightforward enough. Most of our equipment was bought from online retailers where possible. I found online prices to be more competitive than the "special educational pricing" offered to our University. Assemble the kit according to the layout shown below. Production line-style assembly can help speed up the process. Pay particular attention to Lifeproof case instructions. It may be worth engraving the more expensive components with identifiers and contact info. I clearly and permanently label every component as a separate kit to be sure students do not interchange items or cover up that they lost something (ex: all items in a kit labeled "UCR GeoPad #[n]").
(click to see larger)
|
|
|
Setup Gmail & Apple Account
The instructor or person who wants to assume responsibility should consider setting up a dedicated email address (Gmail recommended) either for the GeoPads (e.g. UCRGeoPads@gmail.com) or for the specific course they are using them for (e.g. UCRSummerField@gmail.com). Having a dedicated Google account makes sharing files and documents across the free Google products work particularly well (Gmail, Drive, Docs, Sheets, Slides, etc.). Do not make this password accessible to students.
Upon turning on your first iPad, setup will prompt you to enter or create a new Apple account. Create a new account using your dedicated email address as above. Do not make the password accessible to students. When asked to create a four-digit pin code or thumbprint (iPad mini 3 & 4) click on the fine print "no thanks" option since GeoPads used for teaching should not have sensitive information and should be as accessible as possible. To be able to purchase apps you will need to provide credit card information. Because our University does not issue personal or account credit cards, I give the login details to our department purchasing person and have them fill in their credit card details. When I make a purchase I forward on the email receipt to this person, which works well enough. Your situation may be different.
All iPads should use the same Apple login details. This ensures that you only pay for apps once (not per device), and allows you to easily manage and clone a class or organization set of iPads (which later can be customized individually) from one account.
Basemaps
Cloning a Set of Identical iPads
For use in a class or for an organization. Exact instructions may vary as Apple's software inevitably is updated. These directions work as of November 2016.
-
Setup "master" GeoPad with apps/layout/files that you wish to clone to all GeoPads. This means you should have all data you wish to give the students (basemaps, journal articles, etc.) preloaded before starting to clone the devices. Think carefully about how to arrange according to priority. I hide useless Apple bloatware deep into folders. Add a nice geological background image or your department logo to the desktop. Note that the "master" GeoPad should not necessarily be the instructor's GeoPad (if you want to have your own data, previous year's work, geological maps, music collection, and other things that you might not want on the students' GeoPads).
-
Connect "master" iPad to iTunes. If you are using FieldMove with external map layers (Geotiff or mbtile formats) drag-and-drop them into the app's folder under File Sharing under the iPad in iTunes. Once iPad is 100% ready to go, use Back Up Now to save a copy of the master iPad to the computer. Put master iPad aside. The following directions pertain to the iPad to be cloned.
-
Turn on "clone" iPad. Run through iPad setup (English, US, wifi setup*, Enable Location Services, Setup as New iPad**, Sign In With Your [course] Apple ID, Agree, Don't Use iCloud, Don't Add Passcode, Use Siri, Don't Send Diagnostics, Get Started) *We use 90-day guest accounts to our university's wifi (1 per iPad) to keep students from logging in with their personal details. **You cannot go straight to "Backup" at this point if the Backup iOS version is different than the factory shipped iOS version.
-
On clone iPad go to Settings, then General, then Software Update. Download and Install latest version and Agree. This could take sometime (multitask if necessary). Run through iPad setup again! (see Step 3)
-
On the iPad go to Settings, then iCloud, then Find My iPad. Turn off Find My iPad (log-in required to confirm).
-
Connect clone iPad to computer. Allow iPad access to computer and tell iPad it trusts the computer. Select "Restore from this backup" and be sure your master iPad backup is selected.
-
After restoring you'll have to setup the iPad yet again! Sometimes the wifi log-in seems to be automatically entered wrong. Go to Settings, Wifi, select your wifi, and Forget This Network. Re-select and re-enter wifi log-in details. At this point you should be prompted for Apple verification. Click Settings on the pop-up and enter your account password. Enter it again if you want to sign-in to the iTunes Store. It's now OK to disconnect from the computer. Via the wifi connection the iPad will begin populating the apps onto your home screens. If the iOS updates added unwanted bloatware (Garage Band, Keynote, etc.) you can long press on them, the select the "x" to delete them. Loading of apps could take 5 minutes or so. This is a good time to charge your iPad to full battery. Also don't forget to name your iPad something unique (e.g. "UCR Earth Sciences GeoPad #3") under Settings, then General, then About.
-
The last step may be to go to the App Store, then Updates, then update your apps to the latest version if they were not already (ideally they already are).
-
Repeat Steps 3 to 8 for any additional iPad to be cloned. Once you get the hang of it you can get them through the production line at about five minutes each.
Using a Bad Elf GPS
The cellular version of the iPad Mini 2 has an internal A-GPS/GLONASS receiver that is capable of about 5m positional accuracy (perhaps sufficient for teaching exercises but not research or industrial applications). The Bad Elf GNSS Surveyor is capable of 1m stationary accuracy while in the field (SBAS+PPP) and 10-50cm accuracy with post-processing of raw data (RINEX files). This small device connects remotely to the iPad by bluetooth, overriding the iPad's internal GPS with the Bad Elf's more accurate measurements. The Bad Elf app is a user-friendly utility that helps manage the connection and functionality. Some students preferred to wear the GPS around their neck on a lanyard. I preferred to leave it in the top pocket on my backpack where it was out of the way but had a good view of the sky. I will consider expanding this section if there is demand, but I think the links below do an adequate job of explaining the advantages and procedures.
Bad Elf user guide:
https://cdn.shopify.com/s/files/1/0227/2953/files/UserGuide-BE-GPS-3300-20140517.pdf?1710
Obtaining 1m accuracy in the field:
http://bad-elf.com/blogs/bad-elf/announcement-bad-elf-supports-high-accuracy-location-in-esri-collector
Sub-1m accuracy through post-processing:
https://bad-elf.com/blogs/bad-elf/announcement-new-bad-elf-app-and-firmware-for-the-gnss-surveyor-accessory-post-processing-and-dgps-support
Bad Elf educational discounts:
https://bad-elf.com/blogs/bad-elf/using-gps-in-education
Using FieldMove
This is typically the point at which I start involving undergraduates in the workflow. The GeoPads are ready to go with apps and basemaps preloaded to save time and I just provide a brief explanation of what I did to set it up (download apps, preload data). I consider this last point important as it ensures they have gained a marketable skill that they can setup for an employer or graduate advisor from the start.
Midland Valley has put together a handy User Guide for FieldMove, which includes clear export instructions: http://www.mve.com/media/documents/FieldMove_User_Guide.pdf
Thankfully the FieldMove app is gracefully sleek and intuitive in its organization, which spares me a more detailed walkthrough here. Essentially the map takes up most of the screen real estate with GPS status shown on the top bar and most of the functionality tidily organized on an expandable sidebar (symbols in descending order: Expand Side Panel, Project Properties, Map Layers, Measurements, Drawing Tools, Stereonet, Notebook/Photos, Export, Help). Pinch to zoom the map, drag to move. You'll pick it up in a few minutes!
Click or flick through the images to see some of FieldMove's functionality for an example project.
Exporting Data
Exporting data created in FieldMove is a very straightforward process. All data created in FieldMove are able to be exported including vector-based point/line/polygon data, raster-based photographs (including annotations), and text-based note/measurement data (basemaps are not exported with the GeoPad created data).
For the simplest class exercises we have had students export .kmz files that they submit to a folder in a course Google Drive folder. This is intuitive for the students and easiest for the instructors to grade by opening the KMZ files in Google Earth. When loaded in Google Earth much of the visualization of features is preserved (for example structural measurements will have the correct symbol and orientation; linework colors will be preserved). You can choose to have students (a) submit their raw exported KMZ file immediately on return from the field, (b) give them an opportunity to edit features directly on the iPad, or (c) have the students edit and organize the file in Google Earth. You may wish to have students remove their geotagged field notes and field photographs from the final submitted map or leave them in and grade them as part of the assignment.
For professional products, the more involved procedure of pushing the data to Move or ArcGIS may be more appropriate. The basic steps for exporting are as follows:
-
In FieldMove click on the "three horizontal line" menu option, then the Export symbol. Here you can select which of three file types you wish to export: (1) .mve, the proprietary database-like project format of Midland Valley's Move program, (2) .kmz, the proprietary database-like format for Google Earth, and (3) .csv, a comma separated text file (this option actually exports several output files sorted by data type such as line.csv, plane.csv, note.csv). Choose .mve if you plan to work with Move (a full feature geological software suite allowing the creation of geologically valid 3D models and cross sections, most advanced option). Choose .kmz for quick viewing in Google Earth (easiest option). Choose .csv if you want quick access to notes or structural data. Choose either .kmz or .csv if you are planning to move the data to a third party GIS system, such as ArcGIS.
-
After the "Export Successful" message appears the file will be created and sit in FieldMove's file sharing folder on the iPad. There are two main ways to access the created file:
-
By clicking on the Share button you will have the option of (i) exporting to another Apple device using AirDrop, (ii) emailing the file to yourself, or (iii) file sharing it to a Dropbox or Google Drive folder.
-
Alternatively you can connect the GeoPad to a laptop or desktop computer and open iTunes. Select the iPad icon, then click on the Apps menu, then scroll down to the File Sharing menu, and select FieldMove. You should see all your created files ready to be dragged-and-dropped to you computer desktop.
-
-
If necessary convert the files to the desired file type. KMZs can be resaved as KMLs in Google Earth (this will strip the field photos). A couple methods to convert KMZ to file geodatabases (.gdb) or KML files to ArcGIS shapefiles (.shp) are described at links below.
Midland Valley has put together a handy User Guide for FieldMove, which includes clear export instructions: http://www.mve.com/media/documents/FieldMove_User_Guide.pdf
Info on AirDrop: https://support.apple.com/en-us/HT204144
Opening KMZ in ArcMap: http://thetalkinggeek.com/opening-kmz-kml-files-in-arcmap/
Convert KML to SHP online: http://www.zonums.com/online/kml2shp.php
Convert KML to LYR ArcGIS tool: http://pro.arcgis.com/en/pro-app/tool-reference/conversion/kml-to-layer.htm
UGeorgia Guide to convert KML to SHP: www.uga.edu/gpshort/instructions/GIS_Convertin Google Earth klm to ArcMap shp.pdf
Post-Export Manipulation
See the Research page for a limited discussion of where you can push your field data once back in the office (GIS, 3D mapping, stereonets, etc.). I will aim to add more content as time and experimentation allow.


